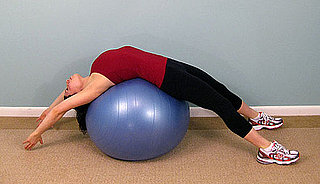
Wednesday, November 27, 2013

Ballet for Scoliosis Part 2: Doorway Exercise

This Ballet for Scoliosis post will be performed primarily in 4th position. I decided that this is going to a series of exercises for scoliosis that relate to ballet. I'm thinking that possibilities are probably virtually endless!

Ballet for Scoliosis Part 2: 

1. Find a sturdy doorframe to stand under to hold onto the edges of while performing the plie.
2. Stand in the center under the doorframe and put your arms up onto the sides with the hands clasping the doors for stability.
3. Place the feet in 5th position as pictured below:

3. While gently holding onto the door frame for support, slowly bend the knees to perform a demmi plie in 5th position. 


4. Then perform a grand plie as pictured below:


5. Switch feet and perform on the other side.

If you can find a doorframe in front of a mirror, that would be ideal because you are able to see which hip is moving up or down when you are performing the plie. 

Plie away, ladies! 

Sunday, September 15, 2013

Intentional Grounding! Football Season Moves for Scoliosis

It's football season! Which means one of two things: 1) you immediately closed this browser tab or 2) you are excited that it's football season! I am a Texan, and thus, I love football season. My appreciation for football started back in middle school when I was in the band and forced to attend every Friday night JV football game. My love of football followed me through high school, college, and now as an adult.

Some ladies loves football, others don't. Chances are, your significant other man-friend do
es like football... So, how you try to enjoy it with him and not nag him as much during season? I'll show you a couple football signals that the referees make during a game so you can try them out and maybe begin having your own sense of fun while watching the game! Plus, you'll earn some much needed cool points as the badass girlfriend who doesn't pester him about one of his favorite pastimes.

There are 2 parts to this football season post:


  • Part 1: football signal moves and what those signals mean (impress your boo, ladies!).

  • Part 2:  "intentional grounding" for scoliosis - ground and floorwork exercises for scoliosis


Part 1: football signal moves and what those signals mean (impress your boo, ladies!).


1) Touchdown


  • Layman's terms: Scoring! When a player makes it to the end zone
  • Fancy terms: A play worth six points, accomplished by gaining legal possession of the ball in the opponent's end zone or by the ball crossing the plane of the opponent's goal line with legal possession by a player. It also allows the team a chance for one extra point by kicking the ball or a two-point conversion

2) Safety:

 
  • Layman's terms: when a quarterback (the dude who throws the football) is tackled in the end zone or when a ball goes out the back of the endzone
  • Fancy terms: A method of scoring (worth two points) by downing an opposing ballcarrier in his own end zone, forcing the opposing ballcarrier out of his own end zone and out of bounds, or forcing the offensive team to fumble the ball so that it exits the end zone. A safety is also awarded if the offensive team commits a foul within its own end zone. After a safety, the team that was scored upon must kick the ball to the scoring team from its own 20-yard line. A safety scored during a try scores 2 points and is followed by a kickoff as for any other try.

3) Unsportmanslike Conduct:


  • Layman's terms: a cheap shot
  • Fancy terms: unsportsmanlike conduct (also called unsporting behavior or ungentlemanly conduct) is a foul or offense in many sports that violates the sport's generally accepted rules of sportsmanship and/or participant conduct. Examples include verbal abuse or taunting of an opponent, an excessive celebration following a scoring play, or feigning injury. The official rules of many sports include a catch-all provision whereby participants or an entire team may be penalized or otherwise sanctioned for unsportsmanlike conduct.

4) False start

5) Delay of game


  • Layman's terms: when a team lets the play clock run down to 0, thereby delaying the start of a play (usually the fault of the quarterback)
  • Fancy terms: a foul which occurs when the offensive team does not put the ball in play before the play clock runs out. There are also less common occurrences which result in a delay of game foul, such as a defensive player holding an offensive player on the ground to prevent him from lining up during a two-minute drill. Penalty: 5 yards.

6) 2 Point Conversion

  • Layman's terms: (Does this look familiar?) It's basically a touchdown AFTER a touchdown when a team is trying to get 2 points instead of the typical 1 point for a kick after a touchdown)
  • Fancy terms: a two-point conversion is a play a team attempts instead of kicking a one-point convert immediately after it scores a touchdown.

Part 2: "Intentional Grounding" for scoliosis - ground and floorwork exercises for scoliosis


Okay, so the title of this post is a bit misleading if you consider yourself a football connoisseur. In football, the term "intentional grounding" means when a quarterback (the dude with football) leaves the pocket (the place where he starts the play and is guarded by his offensive line) and throws the football out of bounds. He does this when he's about to get tackled and does not want to lose yardage, or worse yet, lose the football.

In Migraines No More speak, intentional grounding is much more literal. It is my idea of intentionally grounding yourself on the floor to work your ground chakra and create a strong sense of connection with mother earth and your most basic self.

Exercises for Intentional Grounding:


1) Corpse pose (AKA "savasana")


2) Side lying knee fold over pose (AKA "parvritta pavanmuktasana")


3) Fetal position (AKA "balasana")


I like to practice my fetal position on my back, on my right side, on my left side, and even in a seated position. Curl up in a tight ball with your arms wrapped as far as you can get them around your shins. Take about 5 really deep breaths, protruding the abdomen, and just feel how it feels to be in this position. I get a nice stretch through my right back when I practice this position.

4) Full boat pose (AKA "paripurna navasana")

(I quite liked this picture because it's realistic of people developing into a full boat pose)

Channel that inner Mrs. Brady, ladies!

Wednesday, September 11, 2013

Dog Therapy for Scoliosis: Down Dog and Up Dog Yoga Poses

I have what many would consider a mild obsession with my dog. Please allow me to introduce my own personal man's best friend, Malcolm.

Malcolm is the sweetest black labrador basset hound mix (AKA "bassador") I've ever had the pleasure of meeting. I adopted him 2 ago from a lovely woman who had picked him up after some bastard stopped their car and threw him out like yesterday's trash.

But as they say, one man's trash is another man's treasure.

Malcolm is certainly my treasure. He has added value to my life beyond measure. (I told you I have a mild obsession...) I am an adventurer at heart and I bring Malcolm with me anywhere he is permitted (and probably some places he isn't.) I affectionately call him my "adventure puppy" because he is down for anything just like his "mother." My kind of dog for sure.

Okay okay, enough with the formalities. Let's get to the meat of this post. (Malcolm agrees; meat is one of his favorite things.)

If you have a dog, then do what I do and receive inspiration from him for exercise. This concept is very simple: every time your dog does a down dog yoga pose, you do one, too! Every time your does an up dog yoga pose, you do one, too! You don't necessarily have to do a full-on down dog or up dog yoga pose when your dog does it, but rather allow his movement to inspire and remind you to stretch and exercise. Yoga poses are often named after animals, and down/up dog is an obvious one. Animals have a natural intuition when it comes to ensuring they don't become stiff and immobile. Follow your animal's instincts and your body will begin to feel less stiff and more mobile.

Down Dog Variations (do this when you see your dog do his down dog stretch):

  • Standard down dog on the ground
  • Child's pose on the ground
  • Modified standing down dog pose against the wall

  • Modified standing sun salutation

  • Chair pose

  • Wall half hand stand

  • Dolphin pose

Up Dog Variations (do this when you see your dog do his up dog stretch):

  • Standard up dog on the ground

  • Seated mild spinal arch
 
Another benefit of doing some of these modifications on down dog or up dog is that it allows you to feel the muscles that should be working when you are in the full on up dog or down dog pose on the ground. Sometimes, when we do yoga, we tend to focus so much on the end result and looking like the teacher. Changing it up a little allows you to lose that sense of ego and accidently discover how to deepen your own yoga practice resulting in improved flexibility and ability to enter into poses.

Love my dog!


Saturday, September 7, 2013

Twerking for Scoliosis! Dancing Exercise for Scoliosis

By this point, you will have heard the term "twerk" or "twerking" far too often for comfort from sources ranging from MTV to NPR. If you haven't seen the ill-fated "Twerk by Fire" YouTube video by now, well, you should. I have more than a few choice words to say about all the publicity the long-existing term "twerk" is currently receiving in the media. However, I will limit myself to two points that I feel compelled to make. First, I would like to do my best to educate the world on how to properly twerk (or at least proper twerking techniques for spinal mobility). Second, I feel it is in everyone's best interest if we reduce the number of people going around twerking like Miley and making themselves look extra.

But as it applies to scoliosis, twerking is actually a great way to liberate the tightness of the lumbar spine. Like me (and most?), you've watched those rap videos and have pondered the great question of twerking: How the hell do they pop their booties like that? I'd be willing to put money on it that if you can twerk like these ladies, you don't have scoliosis problems!

But have no fear: I'll be your twerking spirit guide.


Twerking for Scoliosis! How to Guide:


Step 1: Stand with your feet about two feet apart in a wide horse stance. A horse stance is the beginning wide stance for tai chi exercise and a wonderful centering, spinal stabilizing pose to practice. To achieve the proper horse stance, stand tall with the feet touching each other. Slowly toe-heel you feet apart until there are about 2-3 feet between your feet. (The wider the space, the more difficult the twerking will be and also the better the stretch for your lower back.) Slowly bend the knees being sure to keep the knees pointed in the same direction at the toes. If you're doing it with proper form, your toes should be pointing directly in front of you and thus your knees should be facing the front as well.

Step 2: Put your hands on your knees. Begin to tap your right heel to the beat of the song you are listening to. (You are listening to a song, right? If not, pick a jam from my playlist to the right! I find it's much more fun to do dancing exercises with good music keeping me going.) Tap only your right heel. Keep your left foot planted soundly on the ground. Do this movement for around 30 seconds. You should begin to feel your right lower lumbar spine start to loosen up.

Step 3: So, your back should start to feel more loose and, if you're like me, you should start naturally moving your back in a stiff twerking motion. However, keep going through these steps unless you feel bold. Stop tapping your right heel and plant it back on the ground. Keep moving in the stiff twerking motion with both feet on the ground. This movement should look like a standing cat-cow yoga pose with 1) cat: the torso opening and booty slightly curving outward and back and 2) cow: close or hunch the back with the booty coming back to resting. Work this movement for another 30 seconds to a minute to the beat, girl! At this point, I'm hoping you already look better than Miley.

Step 4: Your spine should be loose enough by this point to start advancing your twerk. On the out-booty pop motion (cow yoga pose), begin to pop the booty up. Then return to your resting booty pose. Remember to be in your horse pose for this entire exercise.

Step 5: Continue practice the out-booty pop motion to the beat of your favorite jam. Eventually, your lower spine will feel free enough to easily pop the booty out and up. With time, your will learn muscular control which will making the movement even easier and improve your tight lower back issues.

Work that booty and please help to end twerking disasters from occurring around the world!


Happy Anniversary!

It's been one full year since Migraines No More has been up and running. I want to thank you all for supporting my blog and inspiring me to keep it interesting. I look forward to many more years sharing my quirky stretching ideas with the world.

Peace and love!

Monday, August 5, 2013

Suck It In! Sexy Posture Exercise for Scoliosis and Core Strength

We've all been there, "sucking it in" when that hot guy walks by, or more innocently (and self-defeating?) when trying on a swimsuit. Well, here's an easy exercise to make that beautiful "sucking it in" body last longer than that one in-and-out breath.

Try this exercise standing up. It helps to be wearing a bra or swimsuit so you can more easily visualize your posture.

Stand in front of a mirror and turn to the side.

Do you look a little like this when you are in your normal posture? I do!

Now try "sucking it in" and take a look in the mirror. Chances are, you automatically look better!

Benefits of "Sucking It In" & Exercises for "Sucking It In" Maintenance:

  1. You look better for a few seconds :)
  2. Your ribcage is elevated and your breastbone is raised toward the sky
  3. Your abs (especially the obliques) become momentarily engaged
  4. You probably gained about 1-2 cm in height
  5. Your lower back is elongated
  6. Your lower ab "pooch" is gone
  7. Your boobies look more perky!
  8. Your weight is balanced more on the balls of your feet than your heels
  9. You lost a visual-inch around the mid-section
  10. You are able to breathe more deeply
  11. Your self-esteem probably went up a few points as well :)
What if you could take all of these improvements from "sucking it in" and make them a permanent part of your life?

Well, you can! So do it. It's a daily exercise but an easy one at that.

As often as you can remember daily, or at least once in the morning and once at night, mimic the physical experiences that you have when you are "sucking it in." Your body will eventually become accustomed to this improved posture, and it will start to become second nature to naturally walk taller and sexier.

Go through each of the steps above and work at mimicking the feelings described in each step when you are not holding in your breath. For example, #2 says "your ribcage is elevated and your breastbone is raised toward the sky." So, practice elevating your ribcage and raising your breastbone toward the sky when you are not holding your breath. Another example: #4 says, "you probably gained about 1-2 cm in height." So, practice making yourself 1-2 cm taller by elongating the spine when you are not holding your breath. All of these movements will become second nature and your spine will thank you for it in the end!

Trust, you'd never see a sexy Victoria's Secret model strutting her stuff with her belly poking out with bad posture, not on purpose at least...

Channel that inner Mrs. Brady, ladies!

Tuesday, July 30, 2013

Seated Vertical Reverse Crunches! Lower Ab Exercise for Scoliosis Treatment

It seems as though study/work time is when I feel the most physically creative. Probably because my body is yearning to get up and move! Alas, I've got things to do and should not be getting up, so here's an easy exercise to do while seated: Seated Vertical Reverse Crunches!

Seated Vertical Reverse Crunch Exercise:

1) Cross the feet at the ankles with your feet located beneath the chair/your butt. We all know we should be sitting with our feet flat on the floor at 90 a degree angle, but this blog is about real life....

Your feet should look like the girl closest to the camera, more or less:

2) Keeping the ankles locked together, pick up the knees to "crunch" the lower abs. Pick up the feet just a few inches off of the floor; no need to get all dramatic with it - this ain't the gym, folks! Do 5 "crunches" with this ankle position.

3) Switch ankles and do another 5 "crunches."

If you aren't able to easily lift the knees while in this position, it may help to place your hands gently on the desk in front of you for some support. As for me, I am doing this move as I type this on my laptop! So, that's another idea for you.

This is an easy exercise that you can do to strengthen the core of your core (that pooch area that we women hate) as well as enhance that strong foundation for core and back strength.

For me, this "crunch" is markedly more difficult when I have my left foot behind my right foot. As I do the exercise, I feel my ribcage lift, especially on the right side, which results in much easier breathing and a release akin to leaving the chiropractor.

Which side is easier for you to do? Now, do double the amount on your weaker side! You can also vary the speed with which you do the exercise; the slower to move, the more muscle control you must exhibit. It's almost like a self test of your true strength (or lack thereof!).

Come on... you know you want a break from that TPS report.

#CaseOfTheMondays.

Tuesday, July 16, 2013

House Gym Part 2 - Wall Sit: Scoliosis & TMJ Exercise

One of my favorite things to do when stretching my back is to use a wall or other stationary surface as a grounding plane. Using a strong, stable surface such as a wall ensures that I cannot cheat my body movements toward one side or the other. My body is so used to doing things "wrong" and moving in an anatomically incorrect way that the wall serves as the ultimate teacher, instantly correcting my movements with firm and undeniable clarity. Also, it's free and who doesn't have a little wall space available for a stretch?

Here is an easy exercise that you can do at home for free - the wall sit!


Wall Sit Exercise Steps:

1) Stand with your back against the wall with your feet about 1 foot away from it.
2) Lean back so your butt touches the wall and keep your arms near your side or slightly pressing backward against the wall to further ground your body.
3) Slowly bend the knees so that your lower back makes contact with the wall.
4) Continue to bend the knees into a deeper sitting position ensuring that the back maintains contact with the wall at all times.
5) Go as low down as you feel comfortable (or capable?). The goal is to keep the butt, lower back, and shoulder blades glued to the wall in your wall sit position.

This is a great stretch for your back and it shows you which side you may have a tendency to lean toward.

For more fun with the stretch, while in the wall-sit position, place your hands on your knees and EVER-SO-GENTLY sway the hips from side to side while maintaining full back contact with the wall. Think slow-and-sexy belly dancer movements (see video below!).


For me, this gentle hip rocking is much more challenging on the right side than on the left given my spinal tendency to curve to the left.

Another fun variation of this wall sit exercise is to push up on your toes while in the low sitting position. You can then push up into an easy yoga bridge against the wall, ending in a resting position on your toes and leaning back against your shoulder blades. To achieve this position from a wall-sit position, push up on your toes, elevate the hips and push them out away from the wall, and push the ribcage up and out away from the wall. You should end looking somewhat like the lady in white pictured below... After you've remained in this position for a few breaths, slowly roll the spine back down against the wall until the entire back is flat again against the wall.


I have an earlier posting here about using a foam roller between the knees to stabilize and stretch the lower back. This is a variation on the wall-sit stretch and I encourage you to try it.

So, to summarize, this exercise is: 1) free; 2) a great thigh strengthening workout; and 3) an easy back straightening exercise!

Whatcha got to lose?

Sunday, July 14, 2013

Ballet for Scoliosis: Part 1

The fluidity of ballet movements makes it one of my favorite exercises for my scoliosis woes. One of the most important concepts that ballet has left with me is the idea of pelvic stability. Remember those ballet belts that you wore during class? Those belts are meant to be a visual reminder that the hips should be at the same level when engaging in any movement or activity thereby creating a strong core from whence movement can begin.

One of the most basic ballet moves is a plié. This is what you will be doing!

Ballet Exercise 1: First Position Plié


1. Stand with the heels touching each other and the toes pointing outward (this is first position for the feet). Place the arms up in front of your breastbone and out to the side (this is "second position" for the arms and is pictured above in the image on the left).
2. Sloooowwwly melt (A.K.A. "fondu") by bending the knees while gently lowering the arms (this position equals a "plié" and is the 2nd image on the left). Remember to keep the heels on the ground for the plié.  Straighten the knees to return to position number one when you are standing completely upright.
3. Slowly bend again through the "plié" position and continue bending the knees until your butt is ALMOST touching your heels (read: do not put your butt on your heels - this is cheating and takes away the benefit of the exercise). This time, stay on your heels until you just can't stay on them anymore; then, pick up your heels and balance on the balls of your feet as you gradually lower yourself down. This position equals a "grand plié" and is the 3rd, center picture above.
3. Slowly straighten the knees to return to the neutral, first position where you started.

Try the above exercise in second position! One thing to note is that when you do the second position grand plié, the heels never leave the ground.

Second position plié pictured:


For an added challenge, complete the above plié and grand plié with the arms above the head in "fifth position."

Fifth position arms:

This plié move can be accomplished in a number of ways. Try them all and see what gives you the best stretching results: 
1) Facing a wall with the arms slightly resting against it for stability; 
2) Using the back of a chair for support; or
3) In the center of a room using your abs for core stability and support! Option 3 is harder than it sounds.

Quick tips: try not to overdo the "toes outward" position (A.K.A. "turnout"); pointing slightly outward is the best way to start to make sure you don't mess up your knees. Also, remember to keep the pelvic neutral (remember that belt reference above?) by keeping the lower abs engaged and tight throughout the movement. This will give you the added benefit of an ab workout during your plié!

Plié away! 

Wednesday, May 29, 2013

Bridge On A Ball: Scoliosis Exercise Ball Exercise

My exercise ball comes in handy to perform a number of back elongation and core stabilization exercises. Here's a simple, passive exercise ball exercise that I tried that felt amazing on my tight, right mid-back. It allows for tension release of the shoulders and neck, too. The exercise is relatively passive; assume the position and then just relax into it, allowing your muscles to release their tension as you relax over the roundness of the exercise ball.

Bridge On A Ball Exercise Instructions:


1. Using a standard size exercise ball, sit on the ball on slowly roll the ball to the small of your back. 

2. Straighten your arms above your head with the thumbs resting against one another, palms facing upwards. 

Step 2 should look a little like this:
How to Stretch Your Back Using an Exercise Ball

3. Gently bend the elbows to assume a "bridge" yoga position. Don't press up with the hands; simply let the hands fall back behind your head. Use your feet to step the exercise ball to be closer to the small of your back/beneath your butt.

Step 3 should look like this: 

Step 3 could be your ending pose; but, for me, this position is actually a little more work and not as relaxing as taking the pose one step further. Onto Step 4!

Step 4: Bring the thumbs closer together on the floor with the elbows bent. The thumbs should be resting just below the top of your head. Using your feet, gently move your body to allow the ball to roll lower down your torso toward your booty. The end goal is to have your elbows resting on the ground.

Step 4 should look a little like this (with the ball of course supporting your entire back!):


Easy rolling!  

Friday, April 5, 2013

Crossed Legs? Seated Stretch for Scoliosis

If you're anything like me you probably spend most of your hours at your desk in 1 particular cross legged position. My personal favorite is right leg over left while leaning on to my left armrest. As you can imagine years of being in this exact same position is not doing anything to help my left curving scoliosis.

So I've decided to make a conscious effort to mix things up a bit. Wait for it... Wait for it...

Switch legs and lean in the opposite direction! 


(Photo courtesy this website)

Okay, I'll admit it. This post is probably not the biggest revelation on my blog, but I will say you will feel the effects of changing your position especially if you have been chronically stuck in 1 position for years on end.

To be a bit more precise, my new position is with my left leg over my right knee and with my body leaning to the right side of my chair. After years of leaning left and curving left, it's a challenge to remain leaning to the right. However, shifting my posture into the other direction give me a nice stretch through my right lower back and up through my upper back especially when I maintain the right sided lean.

For an added  stretch when the mood strikes, i will lean forward over my left crossed leg to get a deeper stretch through my lower back, shoulder blade, and even in my right abdominal obliques.

Of course it is best to sit with both feet planted evenly on the ground... but, really, this blog is about reality! I'll try to keep both feet on the ground, but I somehow inevitably end up with crossed legs. :/

This exercise is too easy to not give it a go. Try it and see what you benefits you feel!

Saturday, January 26, 2013

Chin Tuck, Neck Extension: Neck Stretch for Migraines & Neck Pain

It's been awhile since I've updated my blog and I apologize. But you know, the stress of life has really been getting to me. This has made me regress a bit into my former poor posture ways.

I've found myself jutting my chin forward and downward, which causes pain in my upper back from this constant forward position. When I bring my awareness to this terrible position, I perform this easy exercise to straighten my neck and help rid my upper back and shoulders of the pain. Fellow (serious) slouchers, try the exercise below!

Chin Tuck, Neck Extension Exercise:


This exercise is simple and effective. Perform the following steps anytime you feel yourself slumping forward or just needing an easy neck stretch.

1) Roll the shoulders backward and downward. Draw your chin inward to give yourself a slight double chin.
It helps to do this against a wall or a chair to get the feel for pulling the chin inward. At this point, I feel a really nice stretch through my shoulder blade area, especially on the tight right side.

2) To increase the stretch, keeping the chin tuck position from step 1, SLIGHTLY raise the chin to extend the neck.  Don't make the movement too big - think somewhere around 1-2 cm upward at the most. You don't want to overextend the neck and possibly cause injury. Try and make your jaw parallel with the ground while keeping the chin tucked.

I like to add this second part to the chin tuck exercise because I feel like it allows me to straighten my neck more than pretty much any other neck stretch I've tried. Also, I think because of my long history of slouching and subsequent back misalignment, when I just do the chin tuck alone I find myself still with a slightly rounded upper back. It also gives me a good stretch along my right shoulder blade.

Hold the position for about 15 seconds at a time giving yourself the ability to enjoy the stretch and allow your body to learn the feeling of having an elongated neck. Repeat as often as necessary. I like to do this at work or while driving. It's easy and effective.

Here's to neck pain relief!