I was inspired by this photo of a pigeon pose on the bed from Pinterest...

Bedtime Yoga Sequence:
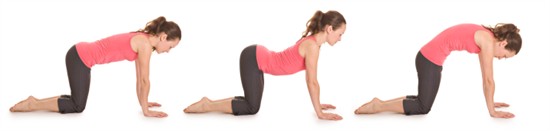
I like to spend 2 breaths in each position - 2 breaths with a neutral pelvis; 2 breaths with an arched back in cat pose; and lastly, 2 breaths with a curved / hunched back in cow pose.
Really remember to physically move your belly with your 2 in-and-out breaths. It will really help to get the most out of the spinal mobilization that you will feel as a result of this movement. I know it's not sexy, but that's not the point of this yoga exercise. No one is watching other than your God.
Don't forget that your head is included in your spine and should therefore also move with your back as you do cat / cow, especially for scoliosis sufferers.
2) After you finish your cat / cow pose, return to a neutral pelvis and flat back position. From here, I like to push my booty backward and upward to the sky while keeping my hands in the position they were in in the all fours. This is a variant of child's pose.
-or-

This position gives me a great lower back stretch and a great stretch through the shoulder blades and back of the neck.
Spend about 4 breaths in this position because it is really easy and it feels really good. :) Try to picture pushing your breastbone to the floor to get a deep yet easy arch to the mid-upper back.
3) Next, ever-so-slowly, roll your spine up one vertebrae at a time to an upright seated position. Don't forget your head should be the last to roll upward and arch the crown of your head slightly back.

You can either have your toes curled under your booty (like in this photo), or with your toes straightened (as pictured in the two poses above). I prefer to sit with my toes straightened.
For fun and an extra stretch, give yourself a seated cat cow yoga stretch in this seated position.
4) Return to all fours. Repeat cat / cow pose for 2 breaths in each pose. Now, go into an easy down dog with soft, bent knees.
Bent knees helps you to get deeper into a down dog pose for a better upper back and neck stretch.
5) From this bent-knee down dog position, lift one leg and get into a 3-legged dog. See my posting on how to best get into this position for maximum pain relief: http://migrainesnomore.blogspot.com/2012/08/down-dog-yoga-pose-for-tmj-spasm.html .

Put your leg back onto the ground and go back into a bent-knee down dog pose. From here, pick up your other leg and perform the 3-legged dog pose again on the other side.
6) Return to a bent-knee down dog, then back to all fours. Give yourself a nice back stretch again (see Steps 2 & 3) and end up sitting on your heels.
7) Now, position yourself on the floor facing right next to the bed on your knees. Using your hands for assistance, place your heel on the bed in front of you with your knee bent and the hip open.
7) Now, position yourself on the floor facing right next to the bed on your knees. Using your hands for assistance, place your heel on the bed in front of you with your knee bent and the hip open.

Bed-assisted pigeon pose
You can either push up on the ball of your floor-foot (as pictured here), or you can remain on your knee. Or (like I do), try a on the ball of the foot followed by on the knee. The knee gives an incredibly deep stretch, yet the softness of the mattress prevents you from overdoing it.
Try your best to keep your hips squared (keep your nipples in a parallel line to the bed) to give your lower back and hips the best stretch possible.
Try your best to keep your hips squared (keep your nipples in a parallel line to the bed) to give your lower back and hips the best stretch possible.
Try tilting the hips upward in this bed-assisted pigeon pose. You will have to use your deep abdominals to pull your booty inward and tilt your hips upward. It's harder than it looks! This offers and even better lower back stretch once you are already in this bed-assisted pigeon pose.
Repeat the bed-assisted pigeon pose on the other leg, of course.
7) To end the sequence, I give myself a nice, deep shoulder stretch, using the edge of the bed for leverage.

Now time for bed. You will sleep like a baby after this easy yoga sequence.
Namaste!
Repeat the bed-assisted pigeon pose on the other leg, of course.
7) To end the sequence, I give myself a nice, deep shoulder stretch, using the edge of the bed for leverage.
Now time for bed. You will sleep like a baby after this easy yoga sequence.
Namaste!
No comments:
Post a Comment