Thursday, September 20, 2012

Bedtime Yoga Sequence: TMJ and Scoliosis Exercise

I've always wanted an easy bedtime yoga routine to do right before getting into bed. Last night, I decided to create one and my back more than thanked me for it.

I was inspired by this photo of a pigeon pose on the bed from Pinterest...

Source: fitsugar.com via Vicki on Pinterest


Bedtime Yoga Sequence:


1) Start in a table top position on all fours on the floor next to your bed. Give yourself an easy cat / cow pose from this all four position.


I like to spend 2 breaths in each position - 2 breaths with a neutral pelvis; 2 breaths with an arched back in cat pose; and lastly, 2 breaths with a curved / hunched back in cow pose.

Really remember to physically move your belly with your 2 in-and-out breaths. It will really help to get the most out of the spinal mobilization that you will feel as a result of this movement. I know it's not sexy, but that's not the point of this yoga exercise. No one is watching other than your God.

Don't forget that your head is included in your spine and should therefore also move with your back as you do cat / cow, especially for scoliosis sufferers. 

2) After you finish your cat / cow pose, return to a neutral pelvis and flat back position. From here, I like to push my booty backward and upward to the sky while keeping my hands in the position they were in in the all fours. This is a variant of child's pose.
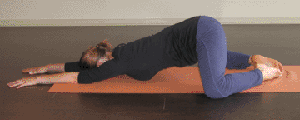

-or-
 
This position gives me a great lower back stretch and a great stretch through the shoulder blades and back of the neck. 

Spend about 4 breaths in this position because it is really easy and it feels really good. :) Try to picture pushing your breastbone to the floor to get a deep yet easy arch to the mid-upper back.

3) Next, ever-so-slowly, roll your spine up one vertebrae at a time to an upright seated position. Don't forget your head should be the last to roll upward and arch the crown of your head slightly back.


You can either have your toes curled under your booty (like in this photo), or with your toes straightened (as pictured in the two poses above). I prefer to sit with my toes straightened.

For fun and an extra stretch, give yourself a seated cat cow yoga stretch in this seated position.

4) Return to all fours. Repeat cat / cow pose for 2 breaths in each pose. Now, go into an easy down dog with soft, bent knees.

Bent knees helps you to get deeper into a down dog pose for a better upper back and neck stretch. 

5) From this bent-knee down dog position, lift one leg and get into a 3-legged dog. See my posting on how to best get into this position for maximum pain relief: http://migrainesnomore.blogspot.com/2012/08/down-dog-yoga-pose-for-tmj-spasm.html .


Put your leg back onto the ground and go back into a bent-knee down dog pose. From here, pick up your other leg and perform the 3-legged dog pose again on the other side.

6) Return to a bent-knee down dog, then back to all fours. Give yourself a nice back stretch again (see Steps 2 & 3) and end up sitting on your heels.

7) Now, position yourself on the floor facing right next to the bed on your knees. Using your hands for assistance, place your heel on the bed in front of you with your knee bent and the hip open.

Standing pigeon pose - lower back stretch and deep abdominal exercise > see if you can tilt your hips upward while in this position!
Bed-assisted pigeon pose 

You can either push up on the ball of your floor-foot (as pictured here), or you can remain on your knee. Or (like I do), try a on the ball of the foot followed by on the knee. The knee gives an incredibly deep stretch, yet the softness of the mattress prevents you from overdoing it.

Try your best to keep your hips squared (keep your nipples in a parallel line to the bed) to give your lower back and hips the best stretch possible. 

Try tilting the hips upward in this bed-assisted pigeon pose. You will have to use your deep abdominals to pull your booty inward and tilt your hips upward. It's harder than it looks! This offers and even better lower back stretch once you are already in this bed-assisted pigeon pose.

Repeat the bed-assisted pigeon pose on the other leg, of course.

7) To end the sequence, I give myself a nice, deep shoulder stretch, using the edge of the bed for leverage.


Now time for bed. You will sleep like a baby after this easy yoga sequence.

Namaste!

Thursday, September 13, 2012

House Gym Part 1 - Sofa Squats: Home Scoliosis & TMJ Exercises

Incorporating scoliosis exercises into your daily routine is the quickest way to see results. I try to create a new way to use pieces of furniture around my house in a way that gives me a nice spinal stretch.

Sofa Squats for Scoliosis


When I go to a group exercise class at the gym and the time comes to perform squats, I always cringe. Squats should be performed in a manner that looks like you are literally about to sit up nice and tall in a chair. Unfortunately, most people at the gym look like they are about to pop a nice squat appropriate for primitive camping only, if you catch my drift. You do not want to have your shoulders leaning way forward; right before you reach the base of your squat, you should look at though are perfectly upright in an invisible chair. If this is not even a little bit hard, then you probably are not doing it right. :/
 
(Photo courtesy of this website.

So, where does the sofa come into play? Well, instead of just assuming that you are that person at the gym doing squats properly, try them on the sofa.

How to Perform Sofa Squats


From a seated position, push straight up with your thighs to a standing position. Don't use your hands! Can you do it? This was just your self test; adjust your difficulty level by leaning your shoulders every-so-slightly forward to give yourself the momentum to stand. You goal is to have your spine as straight up and down as possible while you stand from the sofa. 

This drawing nicely illustrates the upright shoulder position you should aim for when squatting. 
(Drawing courtesy of this page.
You will feel an amazing stretch in your lower lumbar spine, especially on the tight, scoliosis side, not to mention your booty will begin to look nice and toned.

Now, pop a squat!

Wednesday, September 12, 2012

Beyonce! Dancing for Scoliosis and TMJ Pain

Beyonce back bends her way through most of her music videos, which is great for us scoliosis sufferers! I decided to start gathering some of my favorite back bends from her videos to work on my spinal mobility while improving my booty-popping ability.


Music Video # 1: The The "Uh-Oh" Dance, Beyonce - Crazy In Love


You know you're as guilty as I am: we've all attempted the "uh-oh" booty dance from Beyonce's Crazy In Love video at some point.


Performing this "pop" mobilizes the lumbar spine right above the booty and below the ribs.

Music Video # 2: Beyonce - Green Light


This video opens with an easy visual of an easy spinal mobilization + scapular stabilization. To me, it almost seems as if all 3 ladies are almost stationary from the hips upward and they are only slightly moving their hips to achieve the complete body movement.

Screen shot of Beyonce's video Green Light 


You can see from this intro shot that spinal mobilization and also changes to the spine result from very subtle movements of the hips. A great representation of how easy it is to throw the hips and spine out of / into their natural position.

Music Video # 3: Beyonce - Kitty Kat


This video is apparently the extended intro to the above Green Light video. In this video, Beyonce acts and moves like a human kitty kat. To me, she appears to be employing an extended cat / cow without the cow part.


Cat / cow yoga pose is wonderful for mobilizing every vertebra in the spinal column. An extended cat while moving the entire body dancing is an easy, fun, and sensual way to help your scoliosis.

Also, check out my posting on how to properly do a spinal stretch for scoliosis for some extra guidance regarding getting the most out of your extended cat pose!

May the bootyliciousness be with you.

Thursday, September 6, 2012

Fun Spinal Twist for Scoliosis & TMJ

I've been working a spinal twist into my daily routines as often as possible. All of the therapists that I've visited on my journey have commented that I have a severe amount of stiffness in my upper back.

I coulda told you that. :)

So, in an effort to mobilize my thoracic spine, here's an easy exercise that I do while sitting at my desk, driving in the car, or hanging out at home.

Spinal Twist with Arms in the Air

1) Put both arms in the air at 90 degree angles with the palms facing outward. You should sort of look like you are about to start a workout on one of these butterfly workout machines:


2) Now, for the fun. First try the exercise while seated. This will help to ensure that you are evenly working both sides of your torso without the advantage of using the legs to shift your weight.

With both of your arms in the air, similar to the lovely lady in red above, begin to make circles with your arms while at the same allowing your torso and ribs to move in response.

To help visualize this exercise, picture a clock directly above your head. While trying to keep the elbows out to your side, move both hands in circles to point to 12:00, 3:00; 6:00, and 9:00, and finally back on 12:00. Then, try it in reverse to get an even stretch on both sides: point to 9:00, 6:00, 3:00, and back to 12:00.

It should look a little something like this:


3) Give the movement a go in the opposite direction, using the clock visualization to keep you moving in the right direction.

I feel a fantastic spinal twist through my torso, especially on my tighter, right TMJ and scoliosis side.

Once you have mastered this simple exercise, turn on some music, stand up, and perform the exercise in a standing position. This time, add your hips and move your arms in bigger clock-circles.

This exercise is fun and gives me an easy way to perform minor spinal adjustments on myself with an easy spinal twist.


Cool pose for a mild spinal twist that feels amazing for scoliosis sufferers. Try it with your curve-side leg on the top (> for right scoliosis curve and right TMJ sufferers, put the left leg below the right).

Have fun! And please, turn up the bass.